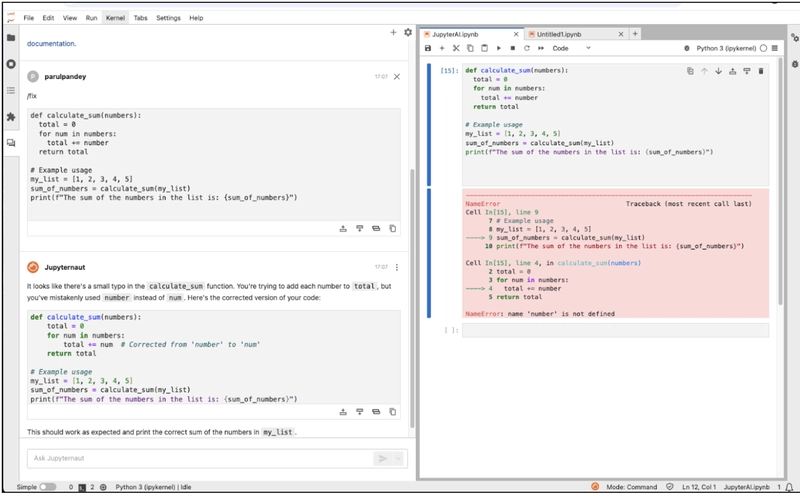
I made my coding assistant based on the article “Build Your Own AI Coding Assistant in JupyterLab with Ollama and Hugging Face”. Here is my experience.
Introduction
First, all the credits of the technical side goes to the article written by “Parul Pandey” which is “Build Your Own AI Coding Assistant in JupyterLab with Ollama and Hugging Face” 👏.
This document is to share my experience by trying to apply the content of the original article locally on my laptop to test it by myself.
Why? Because when I read technical articles I want to reproduce it on my own. First reason: learning by doing. Second reason: Maybe add some ideas of my own (if I have any 😋).
Implementation
The article is straightforward. So a reader familiar with VSCode and Jupyter would make it work in a few!
What I did on my side?
You should have Ollama installed locally and also have an account on Hugging Face site.
I used VSCode (could have just used my terminal) to do the preparations.
- Making a virtual environment.
python3.12 -m venv myvenv
source myvenv/bin/activate
- Installing the requirements and necessary components.
pip install --upgrade pip

pip install jupyterlab~=4.0
pip install "jupyter-ai[all]"

# if problems
pip install jupyter-ai langchain-ollama
- Test your Ollama is up and running!
Ollama --version
ollama serve #this one should raise an error!
ollama list
- Below is the model which is described in the original article;
https://huggingface.co/Qwen/Qwen2.5-Coder-1.5B-Instruct
Qwen/Qwen2.5-Coder-1.5B-Instruct
- And then finally launch your local Jupyter!
jupyter lab
Once you are in the Jupyter lab, if you see the following, then all is OK.
To see this I had to restart Jupyter lab three times, but I got it at last!
Configuration of Jupyter AI
I found slight differences between the screen captures from Parul’s article and what I have on laptop. Below is what I got, you can compare it with the author’s article, but this is normal, because these tools get updates very often (and this is a good thing 😉).
For the copy/paste sake;
Qwen2.5-Coder:1.5b
Test Phase
Now all you have to do is to test the whole thing!
My request for help!
Generate a Python hello world app
And Rohan answered back (I’m à LOTR fan) 😁!
# Import the necessary module for creating a window
import tkinter as tk

class HelloWorldApp:
    def __init__(self):
        # Create the main window
        self.window = tk.Tk()
        self.window.title("Hello World App")

        # Create a label to display "Hello World!"
        self.label = tk.Label(self.window, text="Hello World!")
        self.label.pack(pady=20)

        # Start the GUI event loop
        self.window.mainloop()

# Run the application
if __name__ == "__main__":
    app = HelloWorldApp()
Explanation:
Import tkinter: This is the standard Python library for creating graphical user interfaces (GUIs).
Class HelloWorldApp: This class encapsulates the functionality of our application.
Constructor (__init__):
Initializes a new Tkinter window.
Sets the title of the window to "Hello World App".
Creates a label with the text "Hello World!" and packs it into the center of the window, with 20 pixels of padding around it.
Main Loop: Starts the Tkinter event loop, which keeps the application running until it is closed by the user.
How to Run:
Save the code in a file named hello_world.py.
Open a terminal or command prompt.
Navigate to the directory where you saved hello_world.py.
Run the following command:
python hello_world.py
You should see the "Hello World!" message displayed in a window.
You can now use this code as a starting point for creating more complex GUI applications using Python and Tkinter.
Conclusion
It took me less than one hour to do this. It works and I’m thrilled. Now will I use this for real as a code assistant for my day to day job? Surely not, I’ll tend to use professional tools such a IBM’s watsonx Code Assistant for example, which are bullet-proof industrialized solutions, targeted for business use and trained with trust worthy data. But it was quite insightful to do this practice?
Thanks for reading, see you next time 👍
Links
Build Your Own AI Coding Assistant in JupyterLab with Ollama and Hugging Face (original): https://towardsdatascience.com/build-your-own-ai-coding-assistant-in-jupyterlab-with-ollama-and-hugging-face/


