

Whether you’re prototyping a small script or building enterprise-grade applications, dependency management is a challenge every Python developer must face. And at the heart of that challenge lies a deceptively simple yet critical concept: the virtual environment.
In this detailed guide, we’ll go beyond basic setup commands. We’ll explore:
- What virtual environments are and why they matter
- How Python’s package resolution works under the hood
- How to handle versioning conflicts and transitive dependency issues
- Best practices to ensure your environments remain reproducible and robust
- Tools and workflows used by professional developers
📦 What Exactly Is a Python Virtual Environment?
A virtual environment in Python is a self-contained directory that includes a Python interpreter and an isolated site-packages directory — the place where third-party libraries are installed.
🔍 Why Is This Necessary?
Let’s say you’re working on two projects:
- Project A depends on
Django==3.2 - Project B depends on
Django==4.2
If you’re installing libraries globally on your system Python, it becomes impossible to run both projects without constantly uninstalling and reinstalling different versions of Django — a frustrating and error-prone process.
A virtual environment solves this by creating an isolated space where each project can have its own set of dependencies, regardless of what’s installed globally.
⚙️ Creating and Activating a Virtual Environment
✅ Basic Setup Using venv
python -m venv env
This creates a directory env/ with:
- A standalone Python interpreter
- A
site-packages/directory for dependencies - Activation scripts
✅ Activation
- macOS/Linux:
source env/bin/activate
- Windows:
env\Scripts\activate
You’ll often see your terminal prompt change to show the environment name:
(env) your-machine:~/project-directory$
❌ Common Pitfall: Forgetting to Activate
Many developers install packages thinking they’re in a virtual environment — only to realize later they’ve polluted the global Python environment. Always activate your environment before running pip install.
🔬 Understanding Python’s Environment Resolution
When Python imports modules, it looks through sys.path — a list of directories that includes the virtual environment’s site-packages when it's activated.
You can inspect this in a script:
import sys
print(sys.path)
❓ Am I in a Virtual Environment?
A quick programmatic check:
import sys
print(sys.prefix != sys.base_prefix)
-
Truemeans you're in a virtual environment -
Falsemeans you're using the global interpreter
🔁 Global vs. Virtual: What About Already Installed Libraries?
Short answer: Libraries installed globally are not available in virtual environments by default.
When you create a virtual environment, it starts with zero third-party libraries — only Python’s standard library is available.
✅ Exception: --system-site-packages
python -m venv env --system-site-packages
This allows the virtual environment to access globally installed packages. But be careful — it breaks isolation and can cause version conflicts, especially when global packages get updated.
💡 Best Practice:
Avoid --system-site-packages unless you have a very good reason (e.g. corporate environments with preinstalled SDKs).
🔧 Example Scenario: Version Conflict Resolution
Suppose:
- You have
Flask==2.0.3installed globally - Your project needs
Flask==3.0.0
Even if you install Flask==3.0.0 in your virtual environment, the import may silently resolve to the global one — if --system-site-packages is used.
This can lead to:
- Hidden bugs
- Inconsistent behavior between dev/stage/prod
- Frustrating debugging sessions
🧬 Freezing Dependencies: Why It’s Essential
When you’re working in a virtual environment and installing packages with pip, you're gradually building a dependency graph unique to your project. But unless you record the exact versions used, you have no guarantee your code will run the same way on another machine.
🔧 The pip freeze Command
Once your environment is set up:
pip freeze > requirements.txt
This generates a requirements.txt with pinned versions for all packages in the environment — including transitive (indirect) dependencies.
✅ Example:
Flask==2.2.5
Jinja2==3.1.2
Werkzeug==2.2.3
itsdangerous==2.1.2
click==8.1.3
Even though you only installed Flask, all its dependencies are included — this ensures reproducibility.
⚠️ What Happens If You Don’t Freeze?
- Other developers may run
pip install flaskand get a newer version with breaking changes - Transitive dependencies (used by packages you depend on) may behave differently
- Your CI/CD pipeline or production environment may silently break
🧪 Common Pitfalls with requirements.txt
❌ Manually editing requirements.txt
Avoid adding or removing package lines by hand — you can unintentionally break dependencies. Use tools like pip uninstall or pip install --upgrade and then regenerate the file.
❌ Forgetting to update it
You might install packages during development but forget to re-run pip freeze, leading to missing dependencies when others install from requirements.txt.
✅ Best Practice:
- Always create your environment with:
python -m venv env
2. Activate and install your dependencies
3. Run:
pip freeze > requirements.txt
4. Commit requirements.txt to version control
⚔️ Handling Transitive Dependency Conflicts
❓ The Problem
Two of your direct dependencies may require different versions of the same sub-dependency.
Example:
-
package_Arequirespackage_X==1.0.0 -
package_Brequirespackage_X==2.0.0
Since Python environments are flat (i.e. no per-package dependency tree like Node.js), you can only have one version of package_X at a time. Pip will either:
- Throw a version conflict error
- Install only one version, causing one package to misbehave or fail at runtime
🧰 Tools to Detect and Resolve Conflicts
✅ pipdeptree — visualize your dependency tree
pip install pipdeptree
pipdeptree --warn conflict
This shows you exactly which package is requiring what, and flags any mismatches.
✅ pip check — find broken dependencies
pip check
This reports any installed packages with unsatisfied dependencies — a quick sanity check.
🔄 How to Resolve Version Conflicts
- Check project documentation for compatibility notes
- Try using compatible versions that work for both dependents
- Replace or remove unnecessary packages
- Use isolation: split projects, run components separately (e.g., microservices)
🛠 Tools for Professional Dependency Management
Beyond pip freeze, here are some powerful tools for managing dependencies cleanly and efficiently.
🧪 pip-tools
Let you manage clean, human-editable lists of top-level dependencies (not all the indirect ones).
Step-by-step:
- Create
requirements.in:
Flask
SQLAlchemy
2. Compile it:
pip install pip-tools
pip-compile
3. It generates requirements.txt with pinned versions of all dependencies and sub-dependencies.
✂️ pipreqs — Rebuild requirements.txt from imports
Ever lost track of what you installed manually? pipreqs inspects your codebase and rebuilds requirements.txt based on actual imports.
pip install pipreqs
pipreqs /path/to/project
This avoids bloat from unused packages sitting in your environment.
🧹 pip-autoremove — Clean up unneeded packages
pip install pip-autoremove
pip-autoremove some_package -y
It removes the package and its unused dependencies — helpful during cleanup or refactoring.
🚀 Real-World Python Development Workflows with Virtual Environments
Let’s walk through how you might integrate virtual environments into your actual development process — from local dev to production.
🧑💻 Local Development Workflow
1. Set up a new project
mkdir my_project
cd my_project
python -m venv env
source env/bin/activate
2. Install dependencies
pip install flask requests
3. Freeze versions
pip freeze > requirements.txt
4. Add env/ to .gitignore
You never want to check your virtual environment into version control. Add this to .gitignore:
env/
5. Commit your code + requirements
git add .
git commit -m "Initial commit with Flask setup"
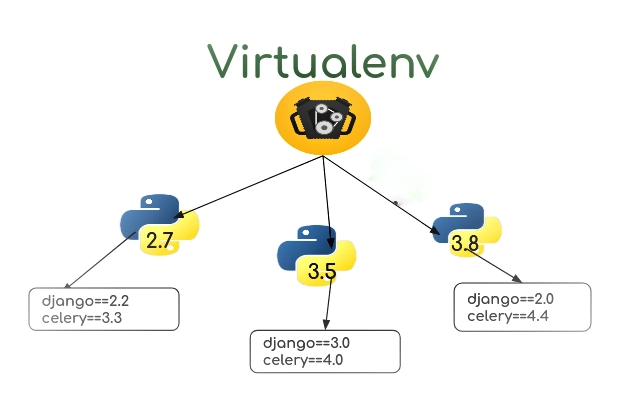
🐍🐍 Using Multiple Python Versions Across Virtual Environments
When working on modern Python projects, managing multiple Python versions is not a nice-to-have — it’s a necessity. One project might rely on legacy code that only runs on Python 3.8, while another may require 3.12 to use the latest language features. The good news: Python’s virtual environment system fully supports this kind of setup, but it requires a bit of tooling and care.
A key concept to remember:
🔑 The Python version used in a virtual environment is not fixed to your system’s default — it’s tied to the interpreter you use when creating that environment.
🔧 Installing and Managing Multiple Python Versions
You’ll need to install multiple Python interpreters manually. Virtual environments don’t come with Python version management built-in — they wrap whatever interpreter you point to during creation.
How you install and switch between Python versions depends on your operating system:
🛠 On macOS and Linux: Use pyenv
[pyenv](https://github.com/pyenv/pyenv) is a Python version manager that lets you:
- Install multiple versions of Python side-by-side
- Switch versions globally or per project
- Isolate and test different environments easily
✅ Setup Instructions
- Install pyenv:
# On macOS
brew install pyenv
# On Ubuntu/Debian
curl https://pyenv.run | bash
Add the following to your ~/.bashrc, ~/.zshrc, or shell config:
export PATH="$HOME/.pyenv/bin:$PATH"
eval "$(pyenv init --path)"
eval "$(pyenv virtualenv-init -)"
Then restart your shell or run source ~/.zshrc.
2. Install Python versions:
pyenv install 3.10.13
pyenv install 3.12.3
3. Create project-specific environments:
cd ~/projects/my-legacy-app
pyenv local 3.10.13
python -m venv .venv
source .venv/bin/activate
Now, even if your global Python is 3.12, this project will run on 3.10.13.
You can check the version inside the environment:
python --version
🪟 On Windows: Use the py Launcher
Windows includes a useful launcher called py, which makes working with multiple installed Python versions simpler.
✅ Example Commands
Assuming you have both Python 3.9 and 3.12 installed:
py -3.9 -m venv env39
py -3.12 -m venv env312
To activate and check the environment:
.\env39\Scripts\activate
python --version
This allows you to quickly create and work with version-specific environments without needing an external version manager.
🧪 Best Practices When Working With Multiple Versions
- ✅ Always install the Python version before creating the virtual environment. Virtual environments don’t fetch interpreters — they only wrap existing ones.
- 🧼 Don’t try to swap Python versions in an existing environment. Always recreate the environment with the new interpreter instead.
- 📁 Use clear, versioned environment names like
.venv311,env-py3.8, etc., especially when switching between environments often. - 📄 Document the required Python version in
README.mdor use a.python-versionfile (for pyenv) to lock the version per project. - 🔁 Use automation scripts to streamline setup. For example:
#!/bin/bash
pyenv install 3.10.13
pyenv local 3.10.13
python -m venv .venv
source .venv/bin/activate
- 🧪 Test your project with multiple versions when building packages, libraries, or tools meant for wider distribution. Tools like
toxand CI matrix builds on GitHub Actions help automate this.
This setup is particularly useful for teams, open-source maintainers, and anyone juggling multiple projects or maintaining long-term support across Python versions.
💡 Pro tip: Treat the Python version as part of your project dependencies — just like any package in
_requirements.txt_.
🧪 Testing and CI/CD Integration
In a CI/CD pipeline (like GitHub Actions, GitLab CI, Jenkins), your virtual environment isn’t carried over. So you need to recreate it from scratch every time using your requirements.txt.
✅ Example GitHub Actions Snippet
jobs:
  test:
    runs-on: ubuntu-latest
    steps:
      - uses: actions/checkout@v2
      - name: Set up Python
        uses: actions/setup-python@v2
        with:
          python-version: '3.11'
      - name: Install dependencies
        run: |
          python -m venv env
          source env/bin/activate
          pip install -r requirements.txt
      - name: Run tests
        run: |
          source env/bin/activate
          pytest
This ensures each build runs in a clean, reproducible environment.
🐞 Common Virtual Environment Issues & Troubleshooting
Here are some frequent problems developers run into and how to resolve them:
❓ Problem: “ModuleNotFoundError”
You’re sure you installed the package, but Python says it can’t find it.
✅ Fix:
- Ensure your virtual environment is activated
- Run
which python(Linux/macOS) orwhere python(Windows) to check that you're using the one from your environment
🔄 Problem: Conflicting package versions
Pip gives you a ResolutionImpossible error when installing.
✅ Fix:
- Use
pipdeptree --warn conflictto locate the dependency - Adjust your
requirements.inorrequirements.txt - Consider using
pip install --upgrade --force-reinstall <package>
🗑 Problem: Your environment is completely broken
Sometimes it’s faster to just reset:
rm -rf env/
python -m venv env
source env/bin/activate
pip install -r requirements.txt
🧾 Best Practices Checklist
Use this as your go-to reference when managing virtual environments and dependencies:
✅ Create a new virtual environment for each project
✅ Never install packages globally unless absolutely necessary
✅ Always activate your environment before working
✅ Freeze your dependencies after any install (pip freeze > requirements.txt)
✅ Use pipdeptree, pip check, or pip-tools to manage dependencies
✅ Exclude env/ from version control (.gitignore)
✅ Use pipreqs for lightweight or legacy projects
✅ Document your environment setup in a README.md or setup.sh
🎯 Final Thoughts
Virtual environments are the cornerstone of reliable, portable, and collaborative Python development. They help you build reproducible environments, avoid dependency chaos, and streamline workflows across teams and systems.
By adopting the practices and tools shared in this guide, you’ll not only save yourself countless debugging hours — you’ll also ensure that your Python projects are robust, scalable, and production-ready.