Overview
Hello everyone 👋
In this article I will explain how to insert i18n feature in an Astro project, and in this case, I took for benchmark, my open source template: Astro Minimal
Let's start! 🤙
Choose your way
First step is very simple: choose the way that you prefer for implement this feature, and there are two:
- Follow the official approach: Astro team provide a simple approach to implement i18n, in this way 🤙
- Use third part library: in this specific section some examples are mentioned 🤞
In this article I will show you the second option, which is to use a third-party library.
The reason for this choice is because, although the official approach is effective, I found it very little scalable, especially in large projects.
Setup the library
Okay, now it's time to install the library.
Open your CLI and run the following command:
npm install astro-i18next
Go to astro.config.mjs file and add the library in this way:
import { defineConfig } from "astro/config";
import astroI18next from "astro-i18next";

export default defineConfig({
  integrations: [astroI18next()],
});
Now create a astro-i18next.config.ts file and add the following code:
import type { AstroI18nextConfig } from "astro-i18next";

const config: AstroI18nextConfig = {
  defaultLocale: "en",
  locales: ["en", "it"],
};

export default config;
In my case, I have set as default language English and as second language Italian, but you can choose the ones you prefer! 😎
It’s time to translate! 👀
Now, it's time to create the translation's files in this way:
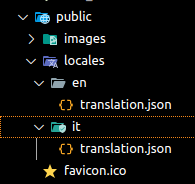
create two folders, "en" and "it" in my case, and add the file translation.json and start compiling the .json file with various static labels scattered around your project
do the same for the label in the italian .json file 🇮🇹
Now that we have the labels, they should be used in our project and to do this we will use a function that the library provides us ✴️
Take the home page for example, which in my case is called index.astro and we import the function t in this way:
import { t } from "i18next";
then we use the imported function wherever it is needed and as input parameter we pass the path of the chosen string, in this way:
<Hero title={t("home.title")} size="is-large" />
in the Hero component, to enhance the prop title, I pass the t function with the correct path that will be taken in the .json files according to the language set.
The final result of the index.astro page will be this:
<BaseLayout
  pageTitle={t("home.pageTitle")!}
  pageDescription={t("home.pageDescription")!}
>
  <section class="column is-6-desktop is-12-tablet fade-in">
    <Hero
      title={t("home.title")}
      titleSize="is-size-1"
      titleSizeMobile="is-size-2"
      subtitle={t("home.subtitle")}
      subtitleSize="is-size-3"
      subtitleSizeMobile="is-size-5"
      size="is-large"
    >
      <div class="columns is-variable">
        <div class="column is-6-desktop">
          <a href={localizePath("/blog")}
            ><Button size="is-large" label={t("home.blogBtn")} />
          </a>
        </div>
        <div class="column is-6-desktop">
          <a href={localizePath("/opensource")}
            ><Button
              size="is-large"
              bgColor="is-primary is-light"
              label={t("home.openSourceBtn")}
            /></a
          >
        </div>
      </div>
    </Hero>
  </section>
</BaseLayout>
localizePath()is a function provided by the library "astro-i18next" and is used to navigate pages without changing the language selected at that time
Generate the Italian version 🇮🇹
Well, after translating all the pages of the project, we generate the Italian version of the site, using a command provided by the library:
npx astro-i18next generate
after command, will be generate in the pages folder another folder called "it" and inside there will be the copy of the content of pages but for the Italian translation
Add translation button 🌐
astro-i18next provide a component called LanguageSelector for change the language.
I imported this in my DefaultLayout in this way:
---
import Navbar from "../components/common/Navbar.astro";
import Footer from "../components/common/Footer.astro";
import "../assets/style/main.scss";
import { LanguageSelector } from "astro-i18next/components";
---

<Navbar />
<slot />
<Footer />
<LanguageSelector
  class="button is-rounded is-sticky"
  showFlag={true}
  languageMapping={{ en: "", it: "" }}
/>
and this is the final result:
Yes, now we have Astro Minimal in two languages!
If you want try the final result this is the demo link ❇️
Conclusion
Astro Minimal speak two languages now, thanks to astro-i18next, and if you want check the source code, follow this repo
Happy coding!✨
Hi👋🏻
My name is Domenico, software developer passionate of Open Source, I write article about it for share my knowledge and experience.
Don't forget to visit my Linktree to discover my projects 🫰🏻
Linktree: https://linktr.ee/domenicotenace
Follow me on dev.to for other articles 👇🏻
If you like my content or want to support my work on GitHub, you can support me with a very small donation.
I would be grateful 🥹


